|
The Warren
Aquire the Main Entry Passkey
Once you arrive at the Warren, begin by finding the escapee (usually east of the Warren's enterance). He's usually within 300 meters from the front door, but can be farther out (500m). Talk to him and ask him where the Warren is and he will give you the Main Entry Passkey to get
in and a waypoint in your datapad to the entrance of the Warren.

Enter the Warren
Begin by entering the Warren and proceeding down the main entry way until you are in a
room with four doors (three plus the one you came through).
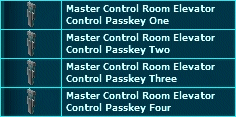
Aquire the master control room elevator passkeys
Go to the door to the far west and follow it until it 'T's off. Take the hall west of the 'T' and you will be in a room with a bunch of lockers and beds. There will be two corpses.
One which holds a letter (C1) and the other which has Master Control Room Elevator Control Passkey One (K1).
Loot both of these. Next, look for the Locker (K3), MagSeal Container (K4), and Metal Chest (K2) that you can open. These three containers hold the other
3 keys to the master control room elevator controls.

NOTE: The letter and keys need time to re-spawn.
Deactivate the defense turrets
Next, take the hall east of the 'T' . You will see a corpse on the ground (C2)
by the elevator and be able to loot the Turret Sequence disk from it.
NOTE: The turret sequence code changes from time to time, so make sure yours is up-to-date.
Go back to the room with the four doors and take the door that is on the south side. Follow the hall around and it
will open up into another room. Take the door to the west and when you enter the small room, go to the terminal (x) on the
north side of the room and speak the code from the turret sequence disk to disable the turret.

NOTE: Once the turret is deactivated, it will remain deactivated for all players for a short time
and then will have to be deactivated again.
Activate surface level elevator
Leave that room and now enter the second door (eastern most door) on the south wall. There take the elevator up (E1). When you
come out, you will see the turret (t) through the first door. Take the door to the south of the turret. You are now in the elevator
control room. Use the four passkeys on the four terminals (o) to unlock the elevator to subterranean level 1 (E2).
Now go back to where you found the corpse with the 'Turret Sequence' disk (C2) and use the elevator next to him to go down to the second floor.
NOTE: Once the elevator has been activated, it will stay activated for players for a short time and then will have to be activated again.
Descend to subterranean level 1
Download Evidence Disk (experiment #1046) from the data terminal (x1).

NOTE: Disks are stored in datapad.
Locate Mirla
Take elevator (E4) down to the second subterranean level, then take the hall to the east and then the first hall to
the right (east). Once you enter the room, there will be a door to the north on the east wall. Follow it until you see a door with debris in
front of it. Destroy the debris and Mirla is behind the door. Talk to her (which will automatically give her the letter) and tell her about
her husband and you will receive the Compassion badge and a password. This password will be used to complete the Imperial Hero badge.
NOTE: The password Mirla gives you changes from time to time.
Gather the final evidence
Download the remaining two available Evidence Disks; experiment #1173 (x2), and experiment #1230 (x3) and the Encryption
Key (x5).

NOTE: Key is stored in datapad.
Go to the cell and say the password, then take the FOUO disk from the corpse (C3). This disk contains instructions on
who to take the evidence to for the badge.

NOTE: This disk spawns every so often, if it has already been looted, you'll have to wait for it to respawn.
Go to the elevator to the third subterranean level (E5).
Aquire the Reactor Core Control Rods
Collect the two Reactor Core Control Rods (R 2x) from the drum in each room.

NOTE: If you run along the far side of the wall, you can avoid being targeted by the altered AT-ST. Also, if the rods have
already been looted, they spawn every so often, so you'll have to wait for them to respawn.
Unlock the Control Room
Take the elevator back to the second subterranean level.
Hit the 'Reactor Core Lockdown Override Switches' (O1 and O2) to allow access into the reactor room.
Go to the reactor room and the two reactor core control rods will automatically be taken from your inventor and put in the drum (D).
This will unlock the control room. You have about 20 minutes until it resets itself.
Go to the control room (which is now unlocked) and download the final Evidence Disk (Entry 1784,x4).
Deliver the evidence
Exit the Warren and take the four evidence disks (experiments #1046,#1173, #1230, and Entry 1784) and the encryption key to
the person named on the FOUO disk.
Map - Surface Level
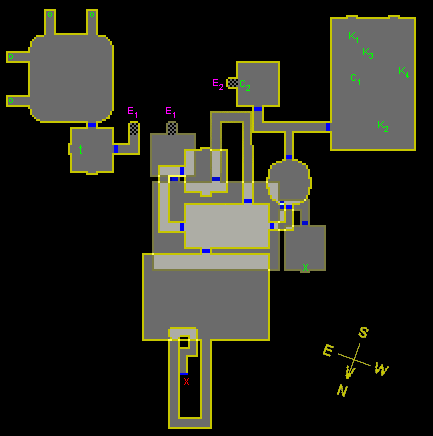 |
| x | Main entrance |
| C1 | Corpse with 'a letter' |
| C2 | Corpse with 'Turret Sequence' |
| K1 | Corpse with '...passkey one' |
| K2 | Metal Chest with '...passkey two' |
| K3 | Locker with '...passkey three' |
| K4 | MagSeal with '...passkey four' |
| x | Turret override |
| t | Turret (must overide) |
| o | Elevator control terminal |
| E1 | Elevator to elevator controls |
| E2 | Elevator to subterranean level 1 |
|
Map - Subterranean Level 1
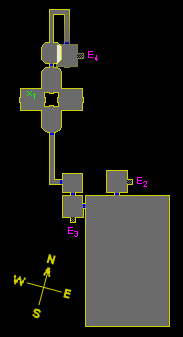 |
| E2 | Elevator from surface level |
| E3 | Elevator to subterranean level 2 |
| E4 | Elevator to subterranean level 2 |
| x1 | Evidence disk (experiment #1046) |
|
Map - Subterranean Level 2
 |
| x | Mirla |
| E3 | Elevator from subterranean level 2 |
| E4 | Elevator from subterranean level 2 |
| E5 | Elevator to subterranean level 3 |
| E6 | Elevator |
| x2 | Evidence disk (experiment #1173) |
| x3 | Evidence disk (experiment #1230) |
| x4 | Evidence disk (Entry 1784) |
| x5 | Encryption Key |
| C3 | Corpse with FOUO |
| D | Reactor Core drum |
| O1 | Reactor Core Override Switch 1 |
| O2 | Reactor Core Override Switch 2 |
| 1 |
| 2 | Reactor Room |
| 3 | Control Room |
| | | Locked door |
|
Map - Subterranean Level 3
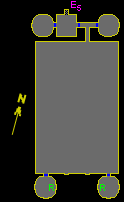 |
| E5 | Elevator from subterranean level 2 |
| R | Reactor Core Control Rod Drum |
| R | Reactor Core Control Rod Drum |
|
Source
Note: This guide has been reproduced from http://www.nofuture.org.uk/swg/the_warren.shtml
| 

